Tools Required
- Table saw
Materials Required
- 4’ of 2x6 lumber (one shelf)
- Painter's tape
- Wood glue
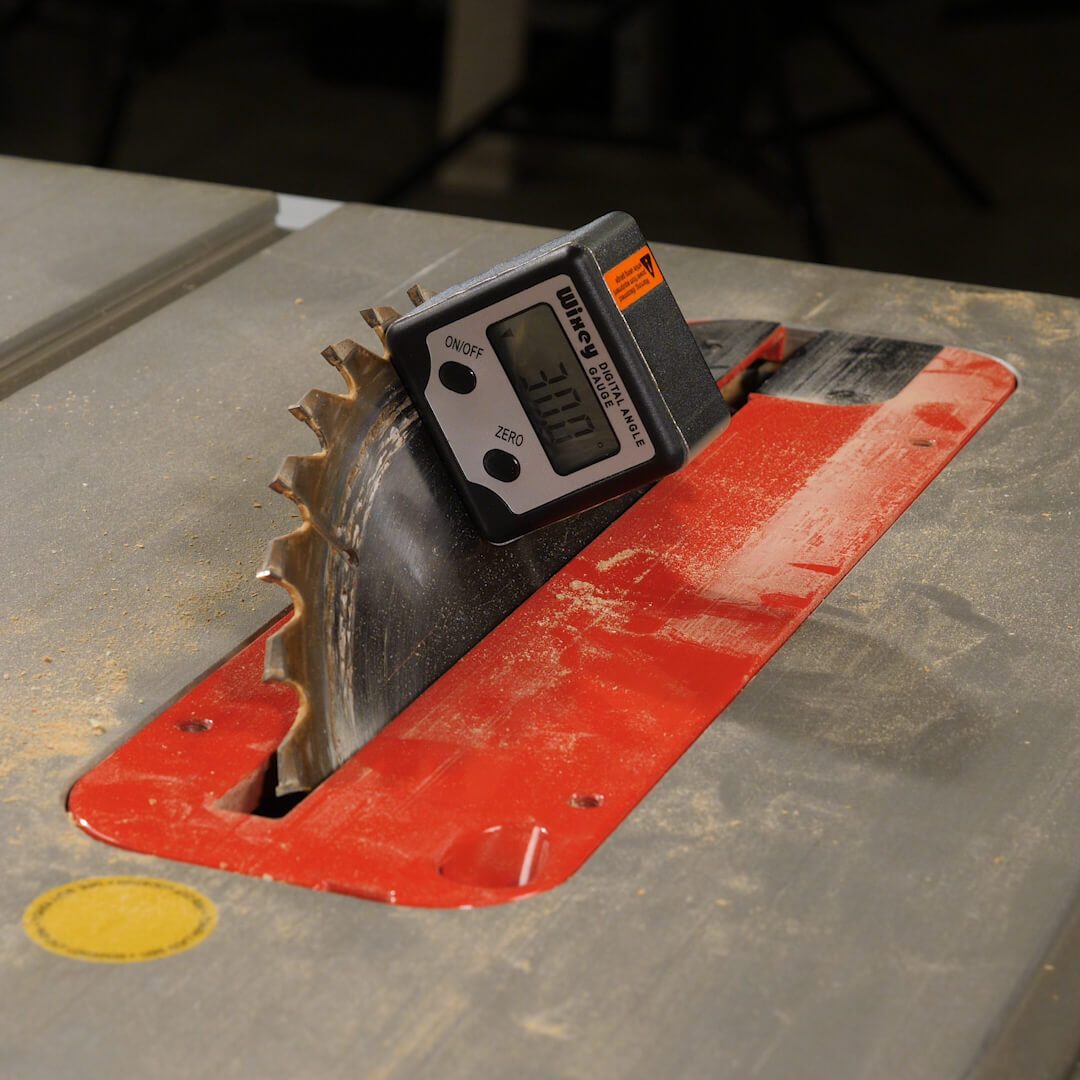
A little bit of math is involved with this build. A symmetrical hexagon has internal angles of 120 degrees, half of which is 60 degrees. The complementary angle of this is 30 degrees. This is the angle that you need to set your saw to. I have a digital angle finder, so I tend to use a table saw and miter gauge to get exact measurements, but it would be very easy to use a miter saw if your saw can be locked at 30 degrees. Crosscut one of the ends of the board for an initial angle.
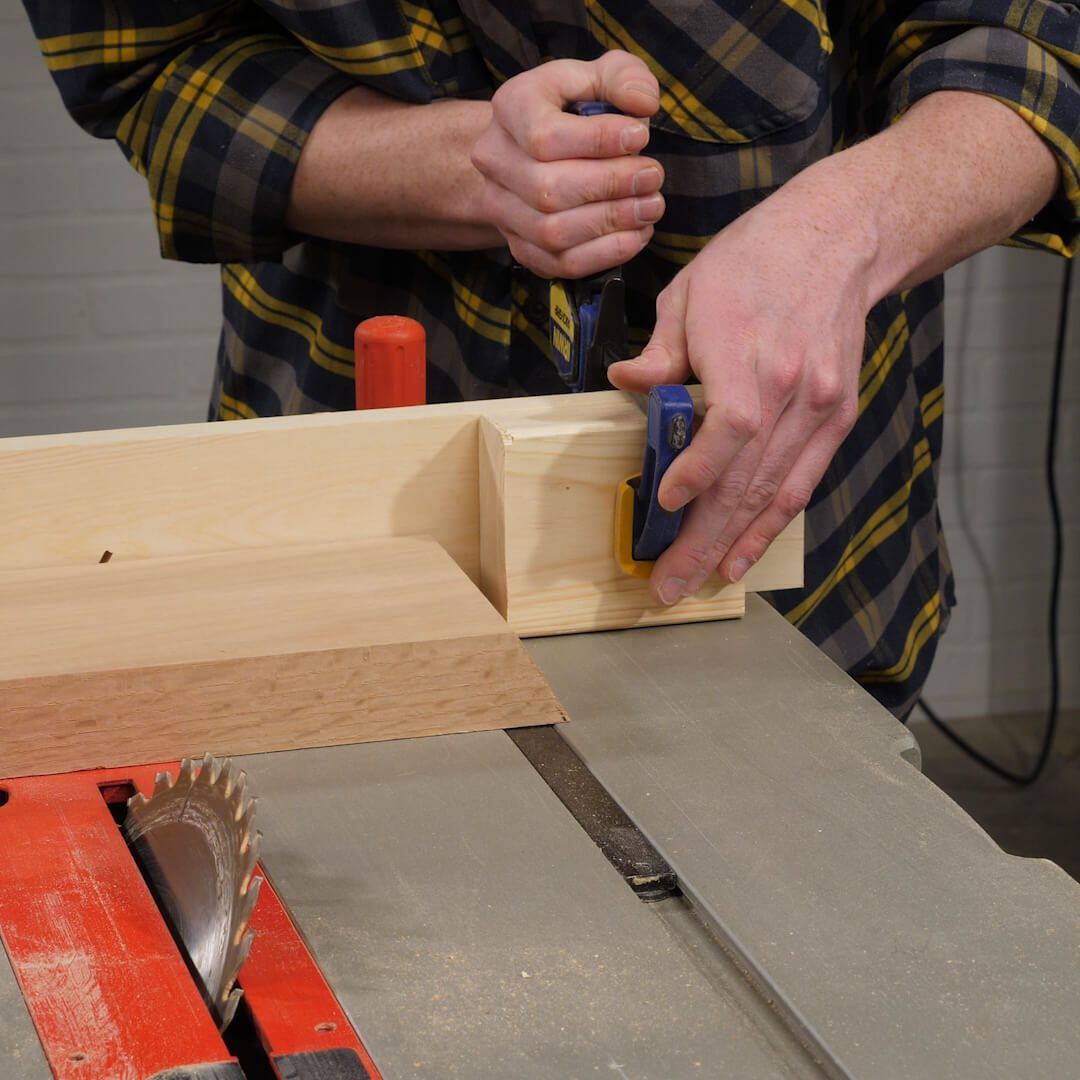
Attach a stop with a clamp (or screw the block to the temporary fence) at 7 in. along the miter gauge to get consistent cuts. Cut six boards to get all of the pieces for the build.
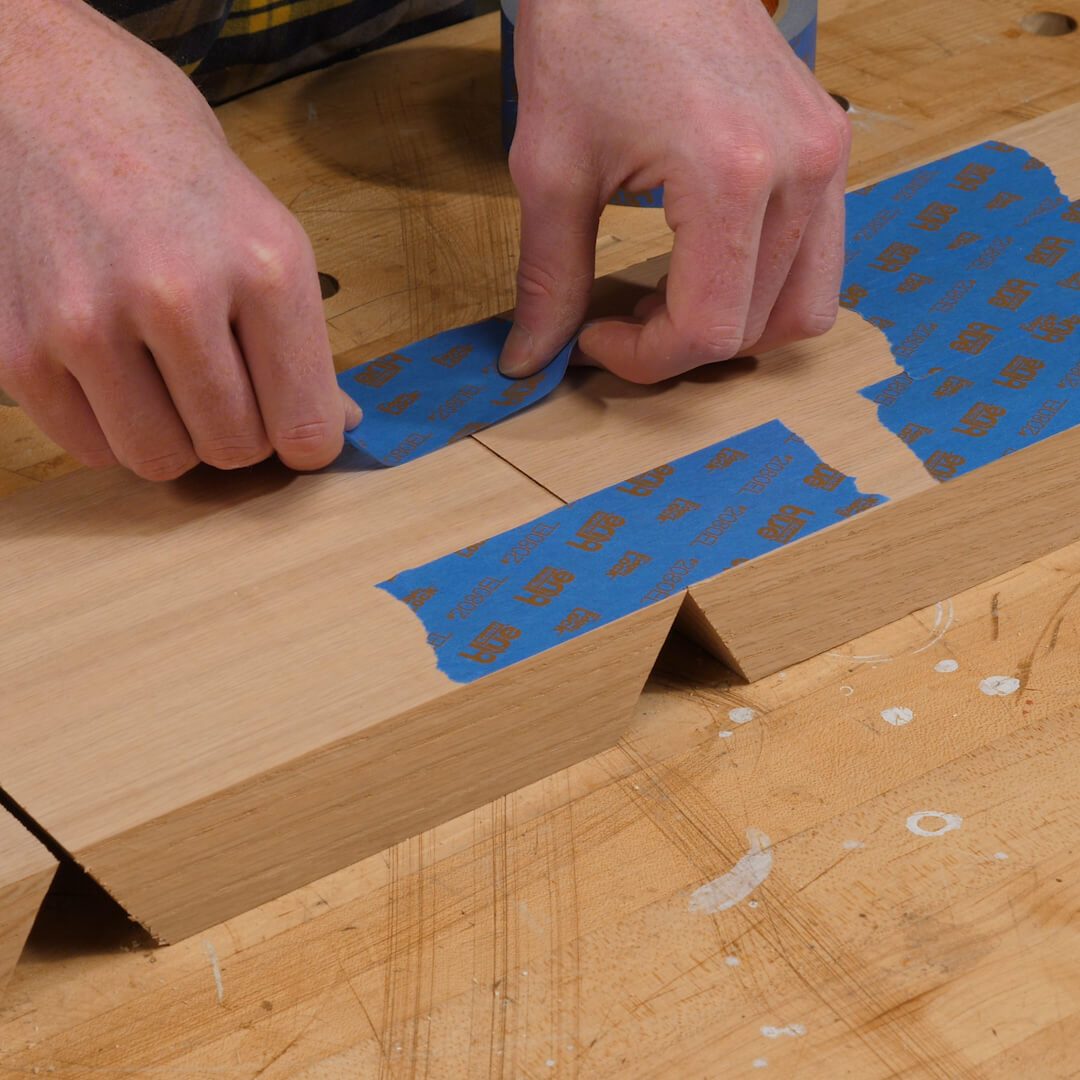
Clamping the boards together with traditional clamps can be fairly complex and tedious. I like to use painter’s tape in these situations. It’s easy to remove and doesn’t affect the wood, but holds well enough to get the job done. Tape the boards together with the sharp end grains touching. Mock up the shelf to make sure your angles are good and it fits together.
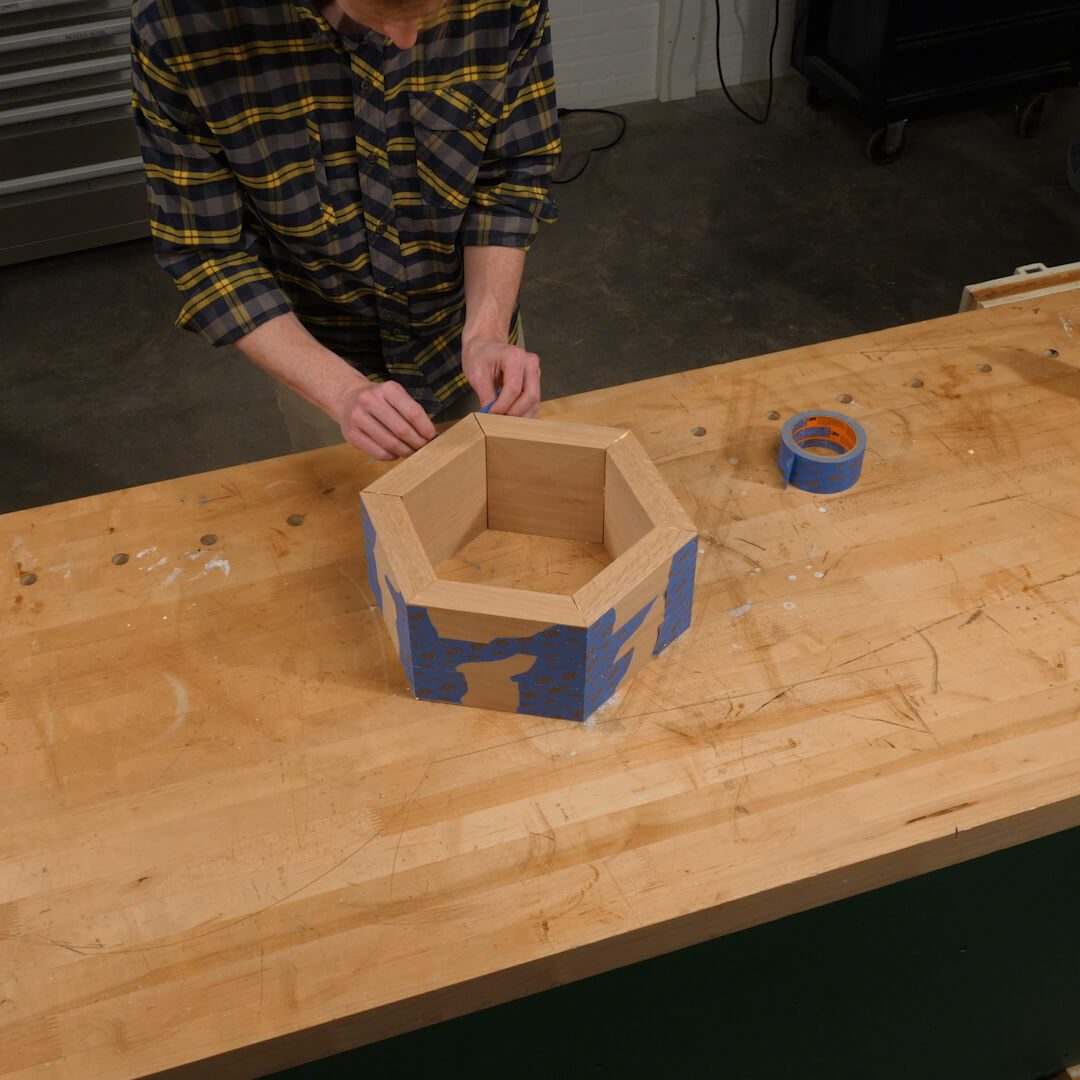
Glue the end grain of the boards, making sure to spread the glue all the way to the edges. Fold the assembly up and secure it with a few final pieces of tape. Let it dry and add finish to your liking. I have made several of these shelves and sometimes the joints don't come together perfectly. If you have some handy, you can use wood filler to fill gaps, or there are many other ways to accomplish the same thing with items already in your workshop.
Source : Click Here
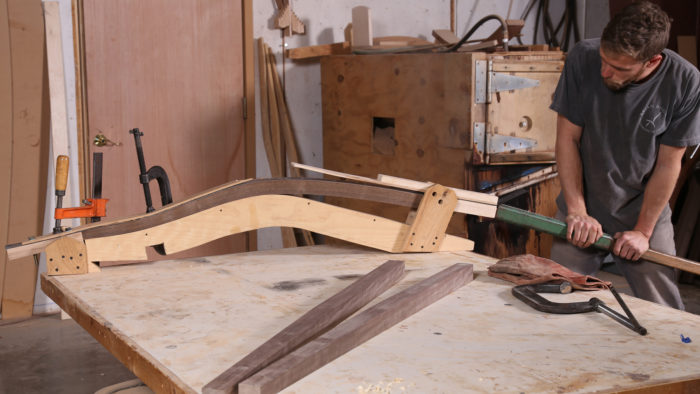
Synopsis: Curves add life, flow, and energy to a piece of furniture; they also add technical challenges. Brian Boggs says mastery of curves is vital for a chairmaker like him, but it’s also a valuable skill if you make casework and tables. Here is a guide to the three chief ways to get curved furniture parts—sawing, laminating, and steam-bending. Boggs lays out the characteristics of each approach, giving advice on which ones work best in each situation.
A straight line is a wasted opportunity. I love that quote from the furniture maker Jere Osgood, a wizard with curves. It’s been curves and their sculptural relationships that have kept me so enthusiastic about furniture design for more than three decades. Curves move and flow and add life to a piece. And, yes, they add technical challenges. A mastery of curves is vital for a chairmaker, but it is also a great boon for the maker of casework and tables.
There are three chief ways to get the curve you want: sawing, laminating, and steam-bending. Each of these methods has an important place in my designs. Sometimes all three are called for in a single chair. Understanding the benefits and limitations of each method and knowing which one to use in each new situation will give you the freedom to bring all sorts of curves into your work.
Here, I’ll lay out the characteristics of each approach to bending—the factors that make one method just right for producing a certain curve but all wrong for producing another one. In addition to weighing the factors I describe, you’ll want to consider the variables particular to your situation: questions of space, tools, time, and the number of duplicate parts you’re making. These factors will also guide your decisions about how to achieve a curve.
Sawing is the starting place. Even if you’ve mastered steam-bending and lamination, sawing will often be the default choice for producing a curve in wood. It is the simplest and quickest method, and it requires the least setup. It allows you to make limitless shapes and, unlike steam-bending and lamination, it lets you create different curves on opposing sides of a workpiece. It also enables you to create curves in stock of virtually any thickness—you’re limited only by the capacity of the saw you use.
The bandsaw is the primary tool for sawing curves. Depending on the situation and on your tool kit, of course, you might sometimes use a scroll saw, a saber saw, or a jigsaw instead. But the bandsaw is the workhorse of sawn curves.
Source: Click Here
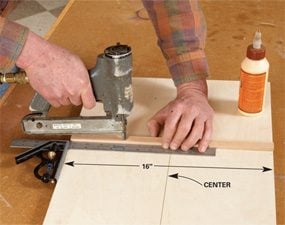
Cut 3/4-in. plywood to 16 x 24 in. Draw centerlines on both sides, then glue and pin the runner to the bottom. Send the jig through the blade until you reach the centerline, then clamp the auxiliary fence to the jigsaw fence.
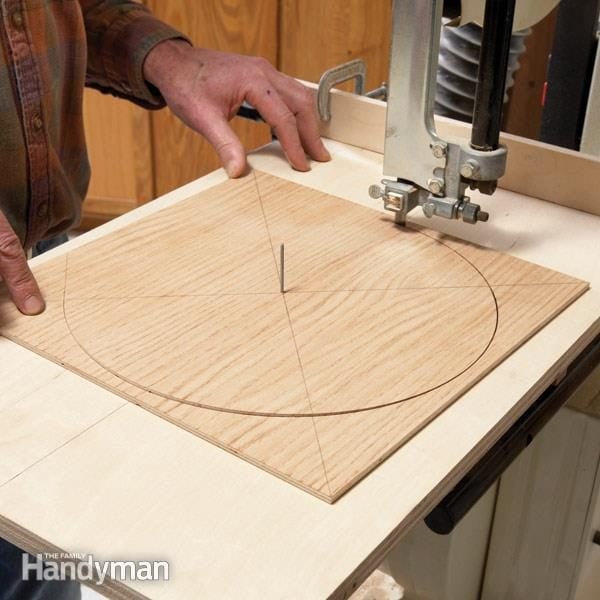
Cutting perfect circles is easy with a band saw—as long as you take a half hour to build yourself a cutting jig. I’ve cut circles with radiuses ranging from a few inches to a couple of feet. The only limit is the distance from the fence to the saw blade.
Use any 3/4-in. plywood to make the jig, and attach a runner to the underside that fits in the band saw’s miter gauge slot. That will hold everything steady while you turn the actual circle stock through the blade. Then make yourself an auxiliary fence from another piece of 3/4-in. plywood as shown. Send the jig through the blade to create the saw kerf, then shut off the saw when the blade reaches the centerline and lock the fence about 1/8 in. away from the jig. Clamp the auxiliary fence to the band saw fence with the stop against the edge of the jig. Hold it slightly above the jig so the jig will slide easily beneath it. The auxiliary fence not only stops the jig at the right spot for turning circles but also keeps the jig from tipping up from the band saw table.
Cutting is simple. You’ll need to choose narrow blades for small circles. Push the jig with the mounted cutting blank until you reach the stop and then just twist the blank through the blade. You’ll have a small amount of cleanup to do where the cut starts and stops. You’re done.
The auxiliary fence provides a positive stop at the jig centerline and keeps the jig from tipping during the cut.
Have the necessary tools for this DIY how to cut a perfect circle project lined up before you start—you’ll save time and frustration.
Avoid last-minute shopping trips by having all your materials ready ahead of time. Here’s a list.
source: Click Here